-->

Tune up utilities free download with keys


Download Newest TuneUp Utilities 2010 Software in full version ...? What are the advantages of Tune Up Utilities 2010? Tune-Up Utilities-2010 can make your Windows Operating system becomes more rapid, stable, comfortable and more secure just a few clicks away.


All operations are performed on the operating system will be completely secure. because all changes will be monitored by Tune Up Rescue Center and can be canceled at any time


TuneUp Utilities 2010 can help us to make Windows accordance with the needs that we want in a fast, easy, better and safer. TuneUp Utilities will make the necessary changes in the registry or boot files automatically.

Some modules in Tune Up Utilities is powerfull features Speeds up the system and to solve error problems and also can be accessed through a common interface and easy to use . some features like tweaks registry, clean up windows files, defrag,monitoring system,Finds and corrects errors on your drives,customize windows styles (symbols, logon screens, the Welcome screen and the visual style), Corrects physical errors in the registry and defragments it, etc.

Download TuneUp Utilities 2010 from tune up website (search in google)
after installion
Download Tune Up Utilities 2010 ( 19.44 MB ) Versi Terbaru 9.0.6000

Download Tune Up Utilities 2011 ( 23.06 MB ) Versi Terbaru 10.0.4500.46

Download Tune Up Utilities 2012 ( 26.63 MB ) Versi Terbaru 12.0.3600.104

SERIAL NUMBER TUNE UP 2010
Full Name = your name
Organization = www.computerinnovations.info
Product Key = B8YMNE-5V94CQ-57YRN5-20YCRK-119NE7-81RVM7

SERIAL NUMBER TUNE UP 2011
Full Name = your name
Organization = www.computerinnovations.info
Product Key = BBQY6K-3V2EN5-KE4W84-2NPTF7-MRX8PQ-1CWDR5

SERIAL NUMBER TUNE UP 2012
Full Name = your name
Organization = www.computerinnovations.info
Product Key = W6DB76-EHNH3K-K4E5AN-5JMNR3-3254MK-52BWYR Atau pilih satu dibawah ini

0WW13E-18KDXB-J3H5M2-WRJ7P6-JX228C-PCKDHV
887RY4-RBB7A4-MB72PK-YJCATA-6VCRH6-A1TH9N
K102NW-RW18H5-7PP1XE-DBP1BQ-WK32VQ-7KRCJW 
R5X8R1-PMK35N-8939RH-Y77XMV-34BEB0-X04DK9 
TJANKN-88KN3Y-85CXTA-7VAFAF-D1AA9M-B29CWN 
RB08NR-ACCYTK-WYX6D7-Y9NAQ9-2MNWF6-5WVR4M
FYHBB0-4X9CF2-NJQ2T4-3V1AVF-X8MP5Q-C5AN54 
6C2ADQ-VM7C6F-H60VE3-76DCMC-05KR2P-7AM3WH

author-pic About author
hiiii......, this is ajay, a chemical engineer by profession, a tech geek by passion, enjoys ethical hacking

Submit your Email Address to Get Free latest Articles/softwares Directly to your Inbox


Dr. Web antivirus working license files


DOWNLOAD KEY FILES HERE

Use the password:computerinnovations823 to unlock the rar file.

1. On the taskbar, system tray, near the clock icon Find Doctor Web.
2. Click on the icon drweb right-click and from the menu select "Tools" the "License Manager" and click the left mouse button.
3. The window "License Manager". In the see information about the installed keys drweb.
4. In order to install antivirus key Doctor Web add it to the list of license manager. To do this, click on the search button and from the menu select the desired file in the selection window.
author-pic About author
hiiii......, this is ajay, a chemical engineer by profession, a tech geek by passion, enjoys ethical hacking

Submit your Email Address to Get Free latest Articles/softwares Directly to your Inbox


avira antivirus, internet security working license files


DOWNLOAD KEY FILES HERE

Use The password:computerinnovations823 to unlock the key files rar

1. Open the window and select the menu item "Help"
2. In the drop-down menu, select "License Management"
3. In the window looking for the words "I already have a valid license file HBEDV.KEY"
4. We press on "HBEDV.KEY"
5 shows a program where lies the key.
6. We rejoice at the successful activation.
author-pic About author
hiiii......, this is ajay, a chemical engineer by profession, a tech geek by passion, enjoys ethical hacking

Submit your Email Address to Get Free latest Articles/softwares Directly to your Inbox


avast pro antivirus, internet security 5-9 working license files


DOWNLOAD KEY FILES HERE

Use the password:computerinnovations823 to unlock the rar

avast! Pro Antivirus, Internet Security, Premier 5 - 9
For Windows XP
1. Disable self-defense and to replace the license file at
2. For avast! 5: «C: / Documents and Settings / All Users / Application Data / Alwil Software / Avast5"
2. For avast! 6 - 9: «C: / Documents and Settings / All Users / Application Data / AVAST Software / Avast»
3. Enable self-defense module avast!

For Windows Vista, 7, 8
1. Disable self-defense and to replace the license file at
2. For avast! 5: «C: / ProgramData / Alwil Software / Avast5»
2. For avast! 6 - 9: «C: / ProgramData / AVAST Software / Avast»
3. Enable self-defense module avast!

avast! Free Antivirus 5 - 9
1. Click on the icon in the system tray, then select "Information about subscribing»
2. Click on the "Enter license key" at the bottom of the screen
3. Insert the key into the form field and click «ok».

author-pic About author
hiiii......, this is ajay, a chemical engineer by profession, a tech geek by passion, enjoys ethical hacking

Submit your Email Address to Get Free latest Articles/softwares Directly to your Inbox


kaspersky antivirus, internet security 2012-2013 license keys working


KIS / KAV 2012-2013
1. Go to the menu "License management", it is in the lower right corner of the main window antivirus. Then remove the current key, pressing the red X next to its description. Then press the "Enter activation code"
2. In the next window, enter one of these activation codes:
- 3G79H-74355-DBPC8-4VX4Y
- BR64D-DPWME-41E31-XDMY4
- YY15F-TUMV3-6RPPK-2KV3Q
- 22222-22222-22222-2222U

DOWNLOAD KEY FILES HERE


Use the password:computerinnovations823 to unlock the rar

Next, disconnect the computer from the Internet (you can just pull out at the time of the power cord from the system unit)
Then click "Next"
3. After the antivirus was not able to connect to the server on the Internet, it will display a window in which you need to click "Browse" button. In the window that appears, select the appropriate key file. Then click the "Next"
4. If everything was done correctly, you should see information about the successful activation.

author-pic About author
hiiii......, this is ajay, a chemical engineer by profession, a tech geek by passion, enjoys ethical hacking

Submit your Email Address to Get Free latest Articles/softwares Directly to your Inbox


ESET NOD 32 activation license keys free


DOWNLOAD setup from anywhere,

 DOWNLOAD KEY FILE FROM HERE, CLICK HERE

Use the password:computerinnovations823 to unlock the rar

1. Open the main window of ESET NOD32
2. In the left pane, select "Settings" -> "Activate the program"
3. Then select the "User name and password"
4. Enter the user name (Username) and Password (Password) -> Activate
5. Then click "Finish"

It is important !!! Turning off the Early Warning System.
Open the main window of ESET NOD32 -> Settings -> Go to the advanced settings ... (F5) -> collapsible section "Tools" -> ESET Live Grid -> Remove the check mark from the "Participate in ESET Live Grid -> We press" OK ".

author-pic About author
hiiii......, this is ajay, a chemical engineer by profession, a tech geek by passion, enjoys ethical hacking

Submit your Email Address to Get Free latest Articles/softwares Directly to your Inbox


Run Windows (and All Your Favorite Windows Programs) on Killer Mac Hardware


Windows is a great operating system, but PC laptops often leave a lot to be desired. If you're a Mac owner (or you're just in love with Mac hardware), you can install Windows natively on your computer in just a few steps. Here's how.

Why Install Windows?

It's no secret I'm a big Windows fan, but I've always been disappointed with PC hardware that I didn't build myself. When it comes to laptops, everything seems to have something wrong with it. The trackpad is a pain to use, the keyboard feels cheap, or the things are just too darn big (though the ultrabook movement is starting to solve the size problem). So, after selling my old MacBook Pro, I ended up buying a MacBook Air, running Windows on it 99% of the time, and I've never been happier.

Obviously, everyone's needs are different. Maybe you still need a few Windows programs, or maybe you just aren't a huge fan of OS X (but you love Mac hardware). Whatever your needs, installing Windows on a Mac is dead simple, even if you don't have a CD drive. All you need is a copy of Windows and the Boot Camp program that comes preinstalled on OS X.
Note: If you hate Apple and feel like ranting to me about the so-called "Apple Tax" (why are you even reading this?), please do it somewhere else. Believe it or not, some of us don't love OS X but find Apple's hardware phenomenal, and are willing to pay a bit extra for it, especially considering you'll be using this computer regularly for a few years. Plus, if you buy refurbished—which you always should from Apple—you can probably get a pretty good deal. So please don't rant about this in the comments. Please keep the discussion focused on Boot Camp.

Step One: Create Your Bootable Windows Thumb Drive

Most modern Macs don't come with a CD drive, so Boot Camp assumes you'll be installing everything with a flash drive. So, if you bought Windows as a digital download, find the ISO now and stick it on your desktop. If you have an actual CD, we'll note where the instructions differ.
How to Run Windows (and All Your Favorite Windows Programs) on Killer Mac Hardware
  1. Insert your flash drive into your computer. Note that you'll need a flash drive with at least 8GB of space—even if your ISO is only 3GB in size (probably because it doesn't take into account discs that are only upgrades).
  2. Run the Boot Camp Assistant (from /Applications/Utilities) and click continue.
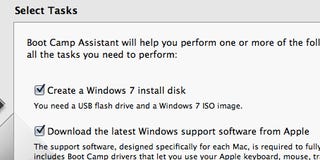
  3. Check the "Create a Windows 7 Install Disk" and "Download the Latest Windows Support Software from Apple" boxes and click continue. This will create a Windows installation thumb drive, along with all the drivers you'll need for your Mac's hardware. If you're using an actual Windows CD, you can uncheck the "Create a Windows 7 Install Disk" box.
  4. On the next screen, choose your Windows ISO image from your computer (if applicable) and click continue. It will download and copy the necessary files. This step can take awhile, and the progress bar can seem like it's stopped moving. Just leave it alone for awhile and let it do it's thing—it'll get there eventually.
  5. When it's done, it will prompt you. Close the Boot Camp Assistant when you're done.

Step Two: Partition Your Hard Drive and Install Windows

Before installing Windows, you'll need to split your hard drive into two parts—one that houses OS X, and one that houses Windows. This is called partitioning, and won't delete any of your OS X data (though I'd back it up before continuing, just to be safe). The Boot Camp Assistant can make this process simple, so we'll use it to perform the required tasks. To do this, just:
How to Run Windows (and All Your Favorite Windows Programs) on Killer Mac Hardware
  1. Open up Boot Camp Assistant (from /Applications/Utilities), check the "Install Windows 7" box, and click Continue.
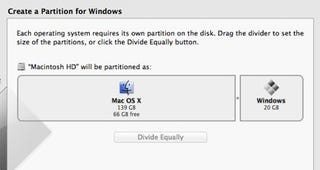
  2. Next, choose how big you want your Windows partition to be. For Windows 7, Boot Camp requires at least 20GB, though if you plan on using Windows a lot, I'd make it much bigger (I chose to divide them equally). You won't be able to resize this later, so make sure you pick the right size now.
  3. With your Windows 7 thumb drive (and installation CD, if applicable) in the computer, click the Install button. Boot camp will partition your disk, then reboot your computer. It might reboot a few times, but soon, you'll be greeted with the Windows 7 installation screen. If it doesn't come up, try holding the Option key after the startup chime, and choosing your Windows installer from the list.
  4. Go through the installation as you normally would. When it asks you to choose a drive, choose the drive labeled BOOTCAMP, as this is the Windows partition we created in step two. Let Windows install, and when it's done (again, after rebooting a few times), you'll see the familiar Windows 7 desktop.

Step Three: Install Apple's Drivers

The last thing you need to do is install Apple's driver software to make sure your trackpad, keyboard, volume buttons, and more work as they should (since by default, they won't). To do this:
How to Run Windows (and All Your Favorite Windows Programs) on Killer Mac Hardware
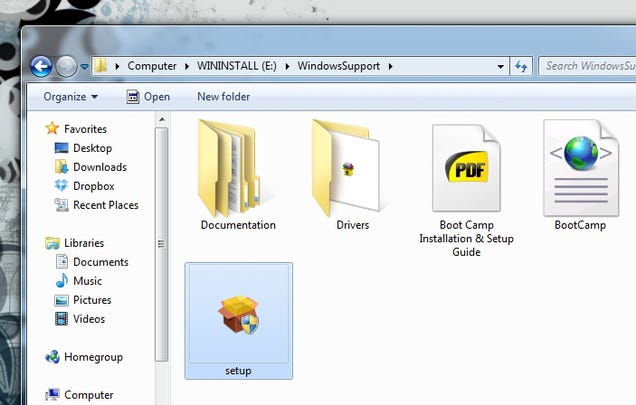
  1. Open up Windows Explorer and head to your Windows thumb drive. Open up the WindowsSupport folder and double-click on Setup.exe.
  2. The setup should take you through the process of installing all the drivers. It'll also ask you whether you want OS X or Windows to be your default operating system, so you can choose that here. If you ever want to boot into the other OS, just hold the Option key when you boot up your Mac—it'll give you the choice of booting into OS X or Windows.
That's all there is to it. You can now install all your favorite Windows programs, share your data between the two partitions, and even get your favorite Mac features in Windows. Enjoy!


author-pic About author
hiiii......, this is ajay, a chemical engineer by profession, a tech geek by passion, enjoys ethical hacking

Submit your Email Address to Get Free latest Articles/softwares Directly to your Inbox